


How to Set Up a Proxy Server in Bluestacks
How to Set Up a Proxy Server in Bluestacks
To configure a proxy server in Bluestacks, you will need a special tool, and it is recommended to use Proxifier. The setup process looks like this:
- Open the Proxifier program on your computer.
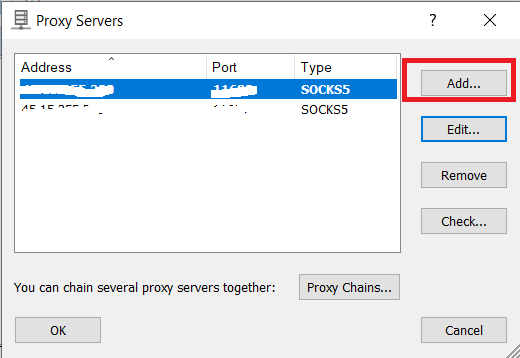
- Select “Profile” and then click “Proxy Servers.”

After selecting “Proxy Servers” in the Proxifier program, click the “ADD” button.
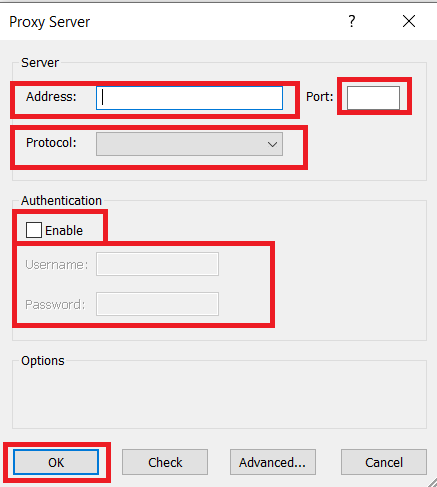
In the new window, enter the proxy IP in the “Address” field. Then follow these steps depending on your case:
- If you are using the HTTPS or SOCKS5 protocol, switch the toggle in the “Protocol” field and enter the port in the corresponding field.
- If the proxy requires authentication, check the “Enable” box in the “Authentication” section.
- Enter the proxy login and password in the respective “Username” and “Password” fields.
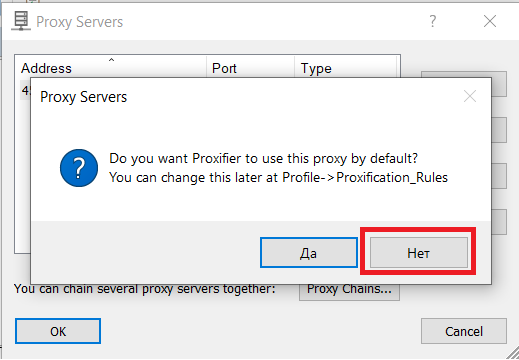
After entering the necessary settings, click “OK.” When the program suggests setting a default rule, be sure to decline this offer. If accepted, the proxy server will be used for all applications on your device. In this case, we want to change the IP only in Bluestacks, so it’s important to refuse to set the default rule.
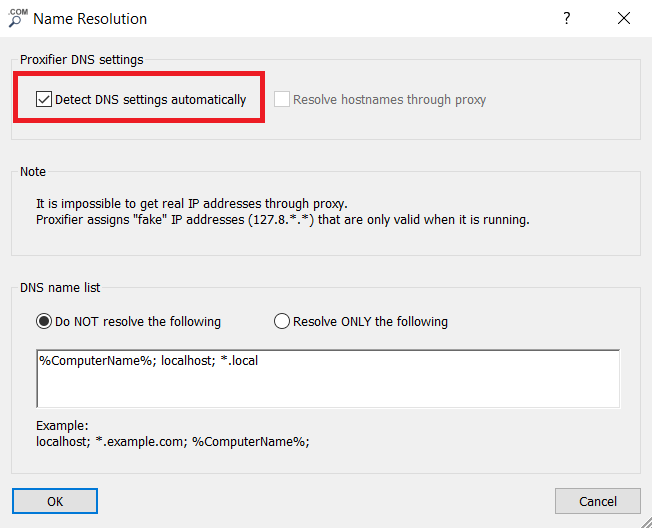
It’s important to note that the DNS from the proxy server will not work in Bluestacks due to software peculiarities. To address this, follow these steps:
- Go to the “Profile” section in the Proxifier program.
- Choose “Name resolution.”
- Tick the box next to “Detect DNS setting automatically.”
Now, let’s create a rule for Proxifier to start proxying Bluestacks. Here’s how to do it:
- Open the “Profile” section in the Proxifier program.
- Click “Proxification Rules.”
- Click “Add” in the bottom left corner.

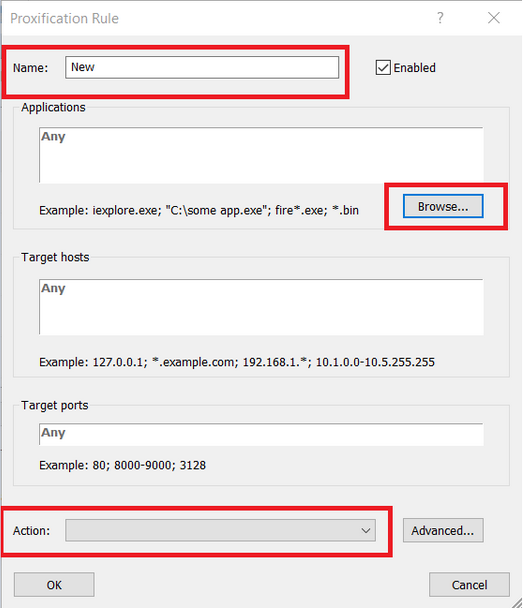
Enter any name for the new rule in the “Name” field.
Click the “Browse” button.
Specify the path to the “HD-Player” file located in the root folder of Bluestacks (at the time of writing, the root folder is named BlueStacks_nxt). We also recommend selecting all files with the .exe extension since Bluestacks is constantly updating, and the “HD-Player” file may have a different name.
In the “Action” field, select the proxy server you want to use for working with Bluestacks.
Great! When you have completed all the previous steps and configured the proxy in Bluestacks using Proxifier, you can launch Bluestacks and open any IP checking website, such as whoer, through the built-in browser. If everything is set up correctly, the site will display the IP of your proxy server, not your real IP. This confirms the successful configuration and use of the proxy in Bluestacks.
Read also

How proxies can help your privacy
Secure search of information in the Internet space and protection of user data are the main factors for users. That's...

The safest browsers for iPhone
User security is an important criterion when choosing a browser for searching the Internet. Many users try to find the...

The safest browsers for Android
Most users access the Internet for recreation or to view various content. However, the majority of users use it for...
What is the difference between IPv4 and IPv6?
You can find a lot of information in the Internet space about what IP protocols are used for data exchange....